Pages

  • About
  • The Edit
  • The Review
  • The Video
  • Contact/PR

How To: Perfect Finish Foundation


Under the fluorescent lights of Toronto's subway car, Tod turns to me to say: "I like this foundation -- the finish is really nice!"  She's a non-foundation wearer, so to hear that literally made my heart sing.  I wasn't actually wearing a new foundation (see my everyday makeup here), but I have been experimenting with my technique.

Base: I've been mixing anything and everything as of late, but a no-fail is my Yaby corrector in Wasabi. This has made me love every single foundation I own which raises it to Holy Miracle Worker status in my books.  While the colour correction doesn't necessarily have anything to do with texture or finish, colour matching is the literal difference between foundation mask and perfected skin.

Correction:  To help get rid of any marks, I photoshop my skin by layering Bobbi Brown Creamy Corrector in light peach directly on the mark, and blending out the colour on top with Cle de Peau Concealer in Ochre.  If I'm being super careful I'll use a Real Techniques lip brush, but most days I just dot on with my fingers and blend with a damp Beauty Blender.

Set: I'm pretty sure this is the foundation game changer -- I've been using a Beauty Blender to press on my powder.  I came about this when I was too lazy to grab another brush and dusted the not-quite-dry Beauty Blender with Ben Nye Luxury Powder in Banana.  Holy mother of staying power and non-white cast.

Glow: Caudalie Beauty Elixir errrrrr'day.

Wardrobe Addition: Nude Heel/Shoe Mullet


I've never owned a nude heel, despite the number of style articles out there that tout its virtue.  Why not?  Honestly, we just never got on.  Most articles talk about a classic nude pump -- I have yet to find a pump that's truly comfortable, or at least bearable -- but most styles tend to be too shiny, too pale, too...something.

Enter the CoSTUME NATIONAL Vima Wedge.  I was at a TNT outlet sale one weekend and snagged these babies for $99 mid-check out. Score. They're not quite classic; the carved wood wedge and the black leather accents keep it from being too basic, but that's exactly what I've been missing.  From the front they look like a classic, almond shaped peep-toe nude heel that comes pretty close to my skin colour, but the wedge is what makes it for me.  I thoroughly adore all 3.25 inches of polished grainy gray, visible only when I walk away.  

What's the expression?  Business in the front, party in the back.

How-To: Contour


After several years of attempting to shape my extremely square-faced/full-cheeked self, I've come to a few conclusions that have helped me achieve the look I want.  It took me a couple of years, so here's hoping I save you a little time.

1) Colour: What product are you using to contour?
For far too long, I continually attempted to slim down my face and nose with a bronzer.  I don't even know what I was thinking -- what kind of shadow is orangey-brown?  Find yourself something properly cool-toned; your colour should mimic the natural shadow on other areas of your face.  For extremely pale skins, something a little more rosy/taupe will work beautifully; for more olive/yellow toned people, lean towards gray.

2) Placement: Don't suck in your cheeks.
I'm not sure who decided that was the right way to go about; I imagine it's the same person who thought smiling while applying blush was also flattering.  However, when you suck in your cheeks, your contour ends up extremely low on your face, resulting in a botched cheek implant surgery look.

Base | Estee Lauder Daywear BB Cream in Light
Contour | Benefit Hoola / Benefit Dallas / MAC Copperplate
Highlight | Dior Amber Diamond
Brows | TooFaced Velvet Revolver
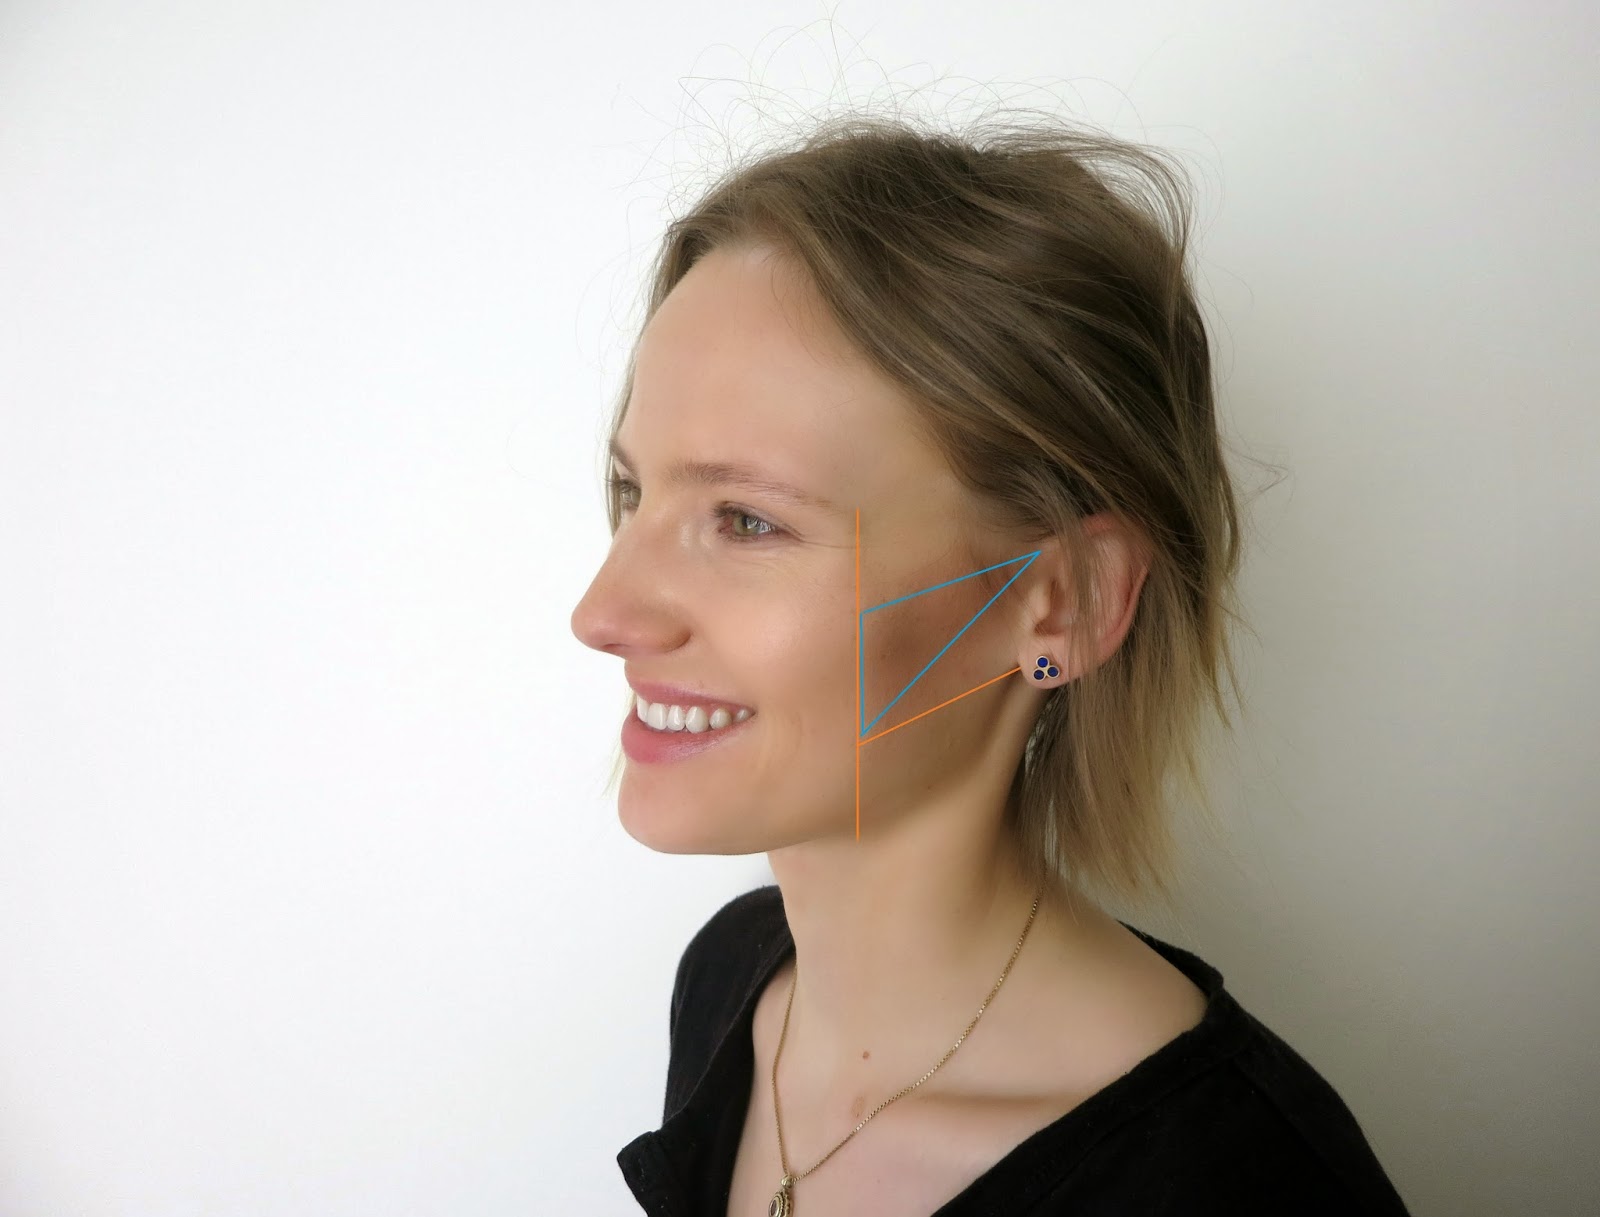
The orange lines are guidelines -- the vertical line goes from the end of your brow to your jaw -- your contour shouldn't extend farther forward than that.  The other orange line goes from the bottom of your ear to the vertical; your contour shouldn't extend lower.

The blue triange is your contouring sweet spot -- the upper angle follows the slope from the top of your ear down to the orange vertical, giving you the most natural placement for the top of your contour.  Focus your product within the blue triangle and blend in every direction -- voila!  Natural-looking contour.

3) Procedure: Go slowly
Many people hail the MAC 109 as their go-to contour brush.  Maybe mine's newer, but it picks up way too much colour for a natural-looking contour. Start slow -- build up your contour gradually with a soft, medium-sized brush (from MAC, I like the 138 blush brush) until you get the right level of shadow.  If you`re using a cream product, be sure to give yourself plenty of room to blend well; try not to swatch on a ton of product at once.  You can always go back and add more!


10 thoughts that occurred when I finally watched You've Got Mail


  1. Whoa, Windows 95 desktop.  I'd forgotten you.
  2. Watching dial-up internet try to get its act together makes me want to tear my own hair out.
  3. Really?  Dreams by the Cranberries?  Was that as ubiquitous in 90s movies as Liz Phair's "Why Can't I" in the mid-00s?
  4. Needlessly complicated Starbucks drinks were $2.95 for a tall.
  5. This movie was made before Price Club became Costco.  Tom Hanks refers to his store as the "Price Club of books."  Funny enough, I bought most of my books at Costco when I was growing up.
  6. Tom Hanks really could use my eye-depuffing remedy.
  7. Meg Ryan's brows have inspired me to do a brow tutorial.  Everyone else has managed to have fantastic brows, not sure what happened to hers.
  8. Tom Hanks' girlfriend was in Josie and the Pussycats! Meg Ryan's shop assistant was in Miss Congeniality!
  9. Everyone now and then, I see a flash of Benedict Cumberbatch in Tom Hanks.  #wishfulthinking
  10. Internet dating has come a long way.

The Edit: Spring Nail Polish Picks


I tend to trade in my usual vamp for something brighter in the summer -- not too crazy, mind you, I still need to retain my muted-tone badassery (#LOL #whatever #yeahright).

I'm not the greatest when it comes to painting my own nails, but in my quest to stop biting my nails and take better care of myself while the warm weather is still motivating me, I'm sharing my top picks for the next season.

Though you know me, I can be pretty unpredictable when it comes to routine.  It wouldn't be the first time a brand new polish came onto the market and made the world tilt.

Any suggestions?  Leave 'em below.

French Wardrobe


Let's talk wardrobe. Not something that comes up often around here on Procrastinating Pretty, because who has time for outfit posts?

In the spirit of decluttering, I'm going to attempt the French Wardrobe technique.  I fell down the Reddit hole the other day to arrive at this fantastic topic; building a wardrobe of solid basics and adding five key pieces per season.

I have the unhealthiest relationship with decluttering; once I start pruning things away, I get recklessly ruthless and give myself a huge pat on the back for having capsulize-d my collection.  Unfortunately, the hoarding craving returns close to immediately, and I find myself purchasing items unnecessarily just to hold on to them for long enough that I feel comfortable getting rid of them.  And so on.  It's a problem.

A no-buy is supremely unrealistic for me -- I'm going to buy stuff.  The first step is admitting you have a problem. With this method, I'll give myself the opportunity to purchase thoughtfully and selectively.  

My first purchase of the season?  This bright fuschia clutch from Zara. I love the metal corner detail.

Return to Vlogging?


Just a quick update to help me get reacquainted with the camera, to figure out where and when exactly is best to film, and to update you all on what's happening in my corner of the internet.  Also, accidentally-on-purpose left in a blooper to prove that I wear pants while I film these. Enjoy!

Design by | SweetElectric